We just finished an LED-Table with Touch-Input that can be used for playing games and controlling Max2Play (Squeezebox Player), as well as showing the audiospectrum of music playing on a Max2Play device.
Highlights
Launcher-App (touch control) running on the table to start Games (Tetris, Snake), Apps or Music. Use the table to start playing Music on a Squeezeplayer connected to your local Squeezebox Server and show the spectrum of the audio on the LED-Table. Use touch buttons on the table to Play/Pause or get Track Information.
The table looks very stylish and just needs a power cable to connect. WiFi and Bluetooth are available and all electronic parts are covered below the table.
Short Summary
The table itself (IKEA Lack 55×55) and all hardware (Raspberry Pi, Arduino Leonardo, 10A Power Supply, LED-Stripe, Wires, Sensors) are at around 250€ all together.
The Software and Build Guide is based on Arbalet Project and enhanced to allow menu control and Squeezebox control.
An Easy Installer with Max2Play helps to set up everything.
… Starting to put everything on this page….
Hope You enjoy!
VERY Important: this LED-Table works with 230V and you are required to solder some parts and wires that use 230V (e.g. for the power supply). The 10A with 5V that is powering the LED-Stripe can be dangerous too, if cables are not placed correctly! The small cables can melt (!) in case of a short circuit. Altogether this project can be very dangerous and if you have no experience in soldering or working with electronics (230V) you MUST ask someone with experience to help you! Otherwise you might harm yourself and others around you.
Project summary
The goal of this project is to make the construction as easy as possible (hardware & software) and fit all parts (even power supply) in the table. And of course: the table should look nice.
A lot of project details regarding cutting, placing and soldering the LED-stripe can be found on the Arbalet wiki page https://github.com/arbalet-project/arbadoc/wiki and on the arduino instructable page https://create.arduino.cc/projecthub/arbalet/touch-led-table-retrogaming-and-ambiant-light-3d3204.
Prepare one IKEA-table to host the LED-Frame
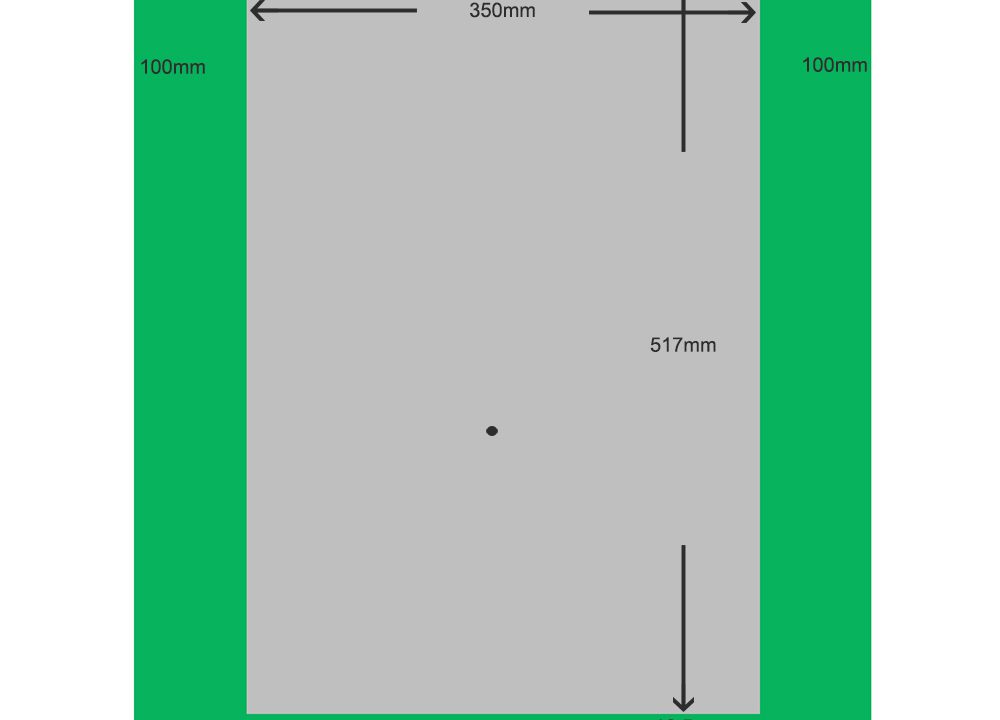
Cut out the top of the table like shown in the following picture and remove the paper below.
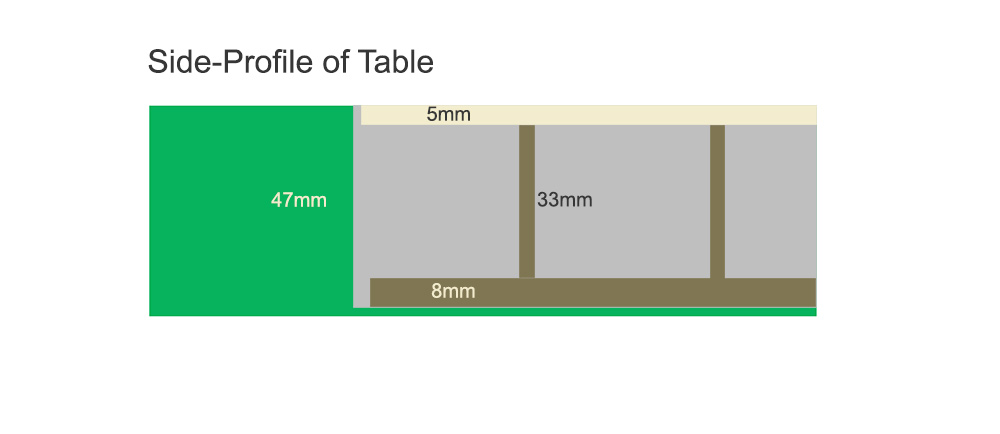
Cut the 3mm wood in pieces of … and …
Cut 18mm deep every 33mm to create the connection points for the frame.
Prepare the IKEA Wall shelf to host the power supply, Raspberry Pi and Arduino
Prepare the IKEA Wall shelf to host the power supply, Raspberry Pi and Arduino … TODO
LED-Table - Part-List
Table Hardware
2x IKEA LACK table (55×55 cm, 903.020.60) http://www.ikea.com/de/de/catalog/products/10324278/
1x IKEA LACK Wall shelf (30×26 cm, 502.821.77) http://www.ikea.com/de/de/catalog/products/50282177/
Plexiglas GS satined 5mm (51.0×34.3) https://www.plattenzuschnitt24.de/Plexiglas-Zuschnitt/Plexiglas-Satiniert-farblos/ ~17€
Wooden plate 3mm thickness (50×100) for LED-Grid
Wooden plate 8mm thick (50×34)
Electronic Hardware
WS2812B 5m 150 RGB LED Strip Stripe (30 LEDs/m) http://www.ebay.de/itm/like/252775898034?lpid=106&chn=ps&ul_noapp=true
Additional Hardware from Reichelt (https://www.reichelt.de, German Online Distributor ships worldwide with good prices)
| FANGRILL-40 | Protective grille for fan, 40 x 40 mm | 0.35 € |
| KES 2SI | Fitted plug for non-heating appliances with fuse link | 1.50 € |
| LITZE RT | Insulated braided copper wire, 10 m, 1 x 0.14 mm, red | 0.76 € |
| ARDUINO LEONARDO | Arduino Leonardo, ATmega32U4, USB | 19.50 € |
| SL 1X40G 2,54 | 40-pin header, straight, pitch 2.54 | 0.19 € |
| DELOCK 83897 | Cable USB 2.0 Type-A male > USB 2.0 Micro-B male 0.5 m transpare | 1.25 € |
| LITZE SW | Insulated braided copper wire, 10 m, 1 x 0.14 mm, black | 0.86 € |
| H05VK 0,75-10BL | 10-m jumper/control litz wire, ST1 – 0.75 mm², blue | 1.75 € |
| H05VK 0,75-10GG | 10-m jumper/control litz wire, ST1 – 0.75 mm², green-yellow | 1.85 € |
| H05VK 1,0-10RT | 10-m jumper/control litz wire, ST1 – 1.0 mm², red | 1.99 € |
| NKSK 150 SW | Cold appliance connection cable, 1.5Â m, black | 2.30 € |
| SNT RS 50 5 | Switching power supply, 50 W, 10 A, 5 V | 15.35 € |
| TR 10A | Microfuse 5 x 20 mm, time-lag, 10 A | 0,28 € |
Also needed: Soldering station and soldering wire
| STATION ZD-931 | Digital soldering station ZD-931 48 Watt | 49.95 € |
| LZ FE 1,0 100 | Soldering wire, 100-g reel, 1 mm, Sn60 | 4.25 € |
Raspberry Pi 3 https://shop.max2play.com/en/raspberry-pi-3-modell-b.html
SD-Card with Max2Play https://shop.max2play.com/en/microsd-karte-mit-max2play.html
Touch Control
MPR121 capacitive Touchsensor controller (12 pins) https://www.adafruit.com/product/1982
ITO (Indium Tin Oxide) Coated PET Plastic https://www.adafruit.com/product/1309
More Resources around the web that helped me with ideas
Most important: https://github.com/arbalet-project
https://create.arduino.cc/projecthub/arbalet/touch-led-table-retrogaming-and-ambiant-light-3d3204
https://learn.adafruit.com/adafruit-mpr121-12-key-capacitive-touch-sensor-breakout-tutorial
http://blog.deconinck.info/post/2016/12/19/A-Dirt-Cheap-F-Awesome-Led-Table
http://www.solderlab.de/index.php/software/glediator
All the Best – Stefan / Max2Play Team
2 Comments
-
Please share the tutorial with us! 🙂
-
yes please!!!
I want to build a simple version of this
I only want the led strip to visualize the music that is playing.
Thank you

